Overview
The openpos persist framework is designed to be a simple OR/M (Object Relational mapping) framework, designed to provide convenience and consistency for persisting Java objects to a relational database, and retrieving objects back into memory. The openpos-persist framework plays a similar role that the Hibernate framework would play in a Java application (although openpos does not use Hibernate in any way).
openpos-persist is compatible with virtually any SQL based database that provides a complete JDBC driver.
Features:
- The ability to generate DDL and create a physical database schema based on Model classes. This also includes the ability to upgrade the schema when changes are encountered.
- JDBC connection pool management.
- JDBC driver wrapper provides statement logging and logging for statements that run longer than expected.
- Persist and retrieve Model objects without any additional configuration required.
- Flexible query framework which allows for named parameters and optional parts to build more specific queries based on what parameters are provided.
- Support for "tagged" data. Any data model can be marked with the @Tagged interface which allows for a very flexible tailoring of data for different regions, stores, or devices, for example.
- Ability to run SQL scripts.
openpos-persist does not try to hide the fact that it works with a SQL based datasource, so certain API's accept SQL directly. However, the cross-platform nature (Oracle, MSSQL, MySQL, Postgres, etc.) should always be considered when writing statements that work with openpos-persist.
Key Classes
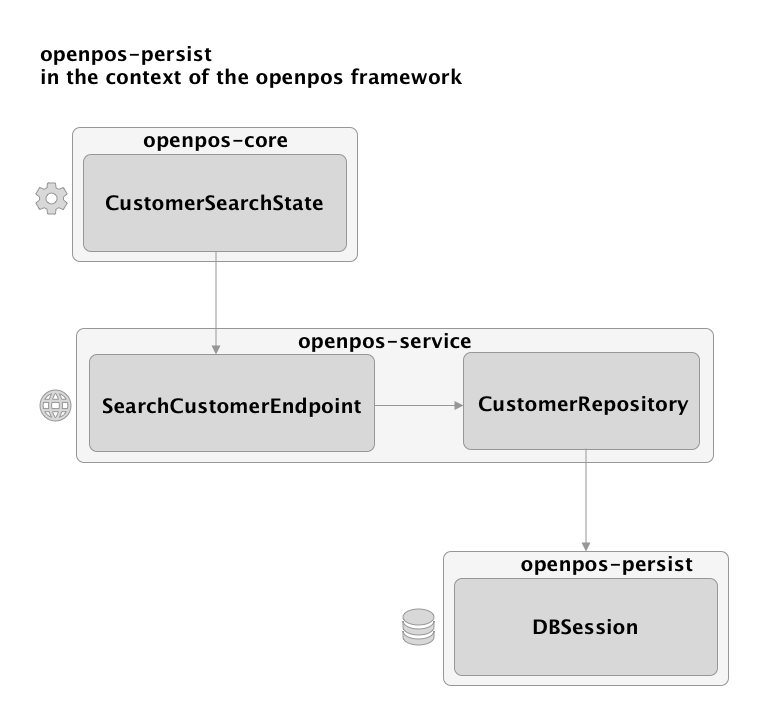
- DBSessionFactory: there is normally one DBSessionFactory per openpos service module. DBSessionFactory knows about the database configuration for a given module, and manages the JDBC connection pool. Mainly, DBSessionFactory creates DBSession instances.
- DBSession: The DBSession represents live interaction with a database. Use a DBSession to save data, run queries, etc. It wraps a JDBC connection, which can be acquired with the getConnection() method. Normally DBSession objects are injected directly into "Repository" classes within an openpos service module.
- TableDef: The class level annotation that defines a data model.
- Query: Defines a named query and expected result type class. Named queries can be used to retrieve either data models or arbitrary objects, and may or may not be mapped to more detailed configuration in a *-query.yml.
Typical Usage Overview
This section will refer to other openpos modules and explain how openpos-persist is designed to fit in.
General Rules for using openpos-persist within complete openpos framework application: * A State should never refer to openpos-persist. * Each module should define 1 DBSessionFactory and db credentials (See subclasses of AbstractModule). The Module class (e.g. CustomerModule) will define a "prefix" which is used to prefix tables within that module (e.g. "cust" for customer.) * Typically, an Endpoint implementation should also not reference DBSession directly but rather should go through a "Repository" object. * The Repository object defines higher level database retrieval and persistence and should not expose SQL details. Think of a repository object as something that could be replaced by a non-SQL database, such as a rest service call or using a noSQL database.
Data Model Annotations
An openpos-persist model is a java bean with the following attributes:
- Extends AbstractModel
- Has a class level annotation of @TableDef
The TableDef annotation
The TableDef annotation declares that the given class is a data model that participates in openpos-persist. It defines the following attributes:
- name: this is the base table name for the model (e.g. "customer"). When used in the context of a module, this will be prefixed with the module prefix. So, assuming a module prefix of "cust", the final table would be cust_customer, for example.
- description: this is used for generating technical documentation for the data model.
ColumnDef
ColumnDef is a field level annotation which maps a Java field to a database table field. It defines the following attributes:
- name: The full name of the field. This is optional; by default the camelCase name of the java field will be converted into "snake" case (words separated by underscores). So a field called itemId in the code will be represented as item_id in the database table.
- primaryKey: Each data model needs to have at least one field marked as a primary key. Adding the primaryKey=true attribute to multiple fields will generate a composite primary key and is a common practice in the openpos framework.
- type: This is optional and should not normally be specified. openpos-persist will determine the JDBC type based on the Java field type. One common use for this is to specify that a String should map to a clob, as in:
type = Types.CLOB
@ColumnDef(type = Types.CLOB,description="The Config value formatted in JSON format") String configValue; - size This is optional and should not normally be specified. String types will default to VARCHAR(128) and BigDecimal types will default to decimal(12,3).
- required defaults to false, unless the field is a primary key field. If true, the schema generated will have this as a non-nullable field.
- defaultValue if specified, generates a schema with the given default value for the field.
- autoIncrement default to false, setting to true will instruct the database schema to create this field as a database auto incrementing field. Use with caution: Often simple auto-incrementing fields do you work well with synchronized, distributed databases, where there could be collisions in the auto-incrementing values.
- description: this is used for generating technical documentation for the data model.
- crossReference: This is used in mapping special types which require knowledge of other field values in order to assemble the final value. This is used to map the Money type. The Money type is composed of two values: the decimal value of the amount, as well as a VARCHAR type for the currency code. A typical use of crossReference is to map a Money field to its corresponding currency code. For example:
    @ColumnDef(crossReference="isoCurrencyCode",
            required=true,description="The price")
    Money price;

    @ColumnDef
    String isoCurrencyCode;
IndexDef
This is an optional, field-level annotation used to define database indexes for lookup performance. When the IndexDef is applied to multiple fields with the same index name then that index will include all the fields. It is possible to order the fields within the index using the *order attribute.
Tagged
Marks the given data model as "tagged" which will add the configured tagged elements (e.g. Brand, Region, Store, etc.) to the model and use those tagged elements to filter results. See Tagging System below.
- includeTagsInPrimaryKey: defaults to true, and makes the tag values part of the primary key. This should be set to false in the case that you need data to be uniquely identifiable across your tags (e.g. a Device may have a unique device ID which spans brand, region, etc.)
Control Fields
Every table in openpos should have the following control fields/meta fields, which are extremely valuable in auditing data sync and distribution issues.
* create_time: when the row was originally created in openpos. This field should not be modified by synchronization
* update_time: when the row was last modified by the retail application. Initially, this value should be the same as the create_time. When an update is later applied, then this update_time should be modified. Using a database standard function such as CURRENT_TIMESTAMP is encouraged for this function.
* create_user: ideally this is set to the application user instead of just the database user if possible.
update_user*: initially the same value as the create_user. If an application user later update a row, than the update_user should reflect the user who modified the row.
Inserting and Updating Data
Data is typically inserted or updated by DBSession.save(model). Note that openpos-persist does not currently provide automatic support for relationships, so it is the developer's responsibility to save the child components of a data model to the database in a transaction.
Database transactionality is currently delegated to Spring and not made explicit by openpos-persist. Specifically, when you need to make transactional calls to DBSession.save(), they should be made from a Spring managed context marked with the Spring @Transactional annotation.
Example of decomposing and persisted elements of a transaction object graph:
    public void save(TransModel transaction) {

        dbSession.save(transaction);

        if (transaction instanceof RetailTransModel) {
            RetailTransModel saleTransaction = (RetailTransModel) transaction;
            List<RetailLineItemModel> lineItems = saleTransaction.getRetailLineItems();
            for (RetailLineItemModel lineItem : lineItems) {
                dbSession.save(lineItem);
                ....
Retrieving data
Data can be retrieved in several ways:
- By Type, ID, or By an example object. DBSession search methods that start with find allow for structured lookups where you have a data model and certain defined fields to search by.
- By Query: For a very flexible means of querying the database, is this methods of the query class can be used. Queries are named and defined in a query.yml file. Typically each module has at least 1 yaml file.
Query details
A query in openpos persist consists of a query definition in in a query.yml file plus a named query declaration in the code.
Consider the following example of searchCustomer:
From cust-query.yml
---
queries:
-
  name: searchCustomer
  select:
      select distinct c.customer_id from cust_customer c
        join cust_group_link l on c.customer_id=l.customer_id
  where:
     l.customer_group_id = ${customerGroupId}
  optionalWhereClauses:
    - c.loyalty_number = ${loyaltyNumber}
    - c.last_name = ${lastName}
    - c.first_name = ${firstName}
    - c.other_identification = ${otherIdentification}
Then the corresponding Java code (in the CustomerRepository):
Query<String> searchCustomerQuery = new Query<String>().named("searchCustomer").result(String.class).useAnd(criteria.isUseAnd());

List<String> customerIds = dbSession.query(searchCustomerQuery, criteria.getCriteria());
Parts of a query definition:
- name: The name of the query. Used by the code to reference the query.
- select: The select portion of the query. If you are querying and your result class is a data model (with @TableDef) then you can omit the select portion of the query.
- where: the main, required where clause. Any named parameters in this portion are considered to be required and an exception will be thrown if not all parameters are provided (in the example above, an exception would be thrown if customerGroupId were not provided)
- optionalWhereClauses: These are where clauses that are only added to the final query statement if the named parameters they reference are present. By default, optionalWhereClauses are added on to the statement as a OR clause. So for the example above, if the loyaltyNumber parameter is provided when running the query, then the framework will add " OR c.loyalty_number = ?' to the generated query.
- orderBy: It's also possible to add an order by clause which will be appended after all the where clauses. E.g.:
orderBy: model_year, make, model
- groupBy: A groupBy element can be specified in order to support aggregate queries.
It's also possible to define a query that specifies arbitrary SQL, as in:
-
  name: carCountByModel
  select: >
    select count(*) as count, model
    from car_car
    where make = ${make}
    group by model
    order by model
The framework will always try hard to match up query result fields with fields on the result class specified in code. A result class does not have to be a data model class but can be any java bean type class. In the carCountByModel, "count" and "model" could be matched up with a simple result class like:
public class CarStats {
    private int count;
    private String model;
    ...
}
To invoke a query, you will need a Query object in code. These can either be statically created and shared, or created locally in a given method.
Query<CarStats> modelCounts = new Query<CarStats>()
        .named("carCountByModel")
        .result(CarStats.class);

List<CarStats> carStats = db.query(modelCounts, "Hyundai");
In the preceding example: * The result class is specified a CarStats.class. A result class could be a data model or any arbitrary java bean. * named: Defines the query name which will match up with a query name in from a -query.yml. * useAnd*: default to false. This determines how the framework logically combines the optional where clauses. The default is to use OR (useAnd=false), but if useAnd(true) is added to the query declaring, then the where clauses will be combined using the AND operator. This setting does not affect the internals of any of the SQL components at all, but only how certain clauses are combined.
Overriding Queries in Base Commerce
It is possible to override a query in base commerce query.yml file with your own version of the query. A use case may be that you would need to return additional columns or alter a value returned for a particular column. Note, however, if you override a query, your override will always be used instead of the base Commerce version. This means that if base Commerce makes changes to the query in future releases, you will not inherit those changes when you upgrade to the new version, which could lead to errors. Please keep this in mind and plan for it accordingly should you choose to override a query. With that in mind, here are the steps for overriding a query.
- Find the base Commerce query.yml file containing the query that you want to override.
- Create an empty query.yml file in your project with the same name as the base Commerce query.yml file. Place your query.yaml file at root of the classpath. For example, in your
retailer-base/src/main/resourcesdirectory, whereretaileris the value of your project prefix. - In your query.yml file, define your new query with a name that is the same as the base Commerce query that you are overriding.
Your query.yml file will effectively be merged into the contents of the base Commerce query.yml file of the same name. Therefore, it is possible for you to both modify base Commerce queries and add your own queries within a query.yml file. If any queries in your query.yml have the same name as a base Commerce query, your query will replace the base Commerce version. Otherwise, your query will be added to the collection of available queries.
Example:
You want to change the searchCustomer query found in the base Commerce cust-query.yml to include a custom column named legacy_id in the query where clause.
-
Create your cust-query.yml file as follows:
````yaml
queries: - name: searchCustomer select: SELECT cc.customer_id FROM CustomerModel cc where: cc.customer_id in ( SELECT cal.customer_id FROM CustomerAccountLinkModel cal JOIN CustomerModel cm on cal.customer_id = cm.customer_id WHERE (cal.account_id = ${accountId} OR ${accountId} = '#') AND cal.account_type = ${accountType} AND (cm.customer_id = ${customerId} OR ${customerId} = '#') AND (UPPER(cm.last_name) = ${lastName} OR ${lastName} = '#') AND (UPPER(cm.first_name) = ${firstName} OR ${firstName} = '#') AND (cm.other_identification = ${otherIdentification} OR ${otherIdentification} = '#') AND (cm.legacy_id = ${legacyId} OR ${legacyId} = '#') # This is your sample modification to the query )
```
2. Place that file in your project (e.g., at
retailer-base/src/main/resources` as mentioned previously) so that it will be located at the root of the Java classpath.
Example:
You want to add your own custom customer query to those queries already found in the base Commerce cust-query.yml. Note: you can both add new queries and modify base Commerce queries in a single query.yml file.
1. Create your cust-query.yml file as follows. Your query name needs to be unique and must not collide with existing queries.
````yaml
---
queries:
  - name: customersByDotComId  # This is your new query
    select: select * from CustomerModel
    where:
        retailer_dotcom_id = ${retailerDotcomId}
```
2. Place that file in your project (e.g., at
retailer-base/src/main/resources` as mentioned previously) so that it will be located at the root of the Java classpath.
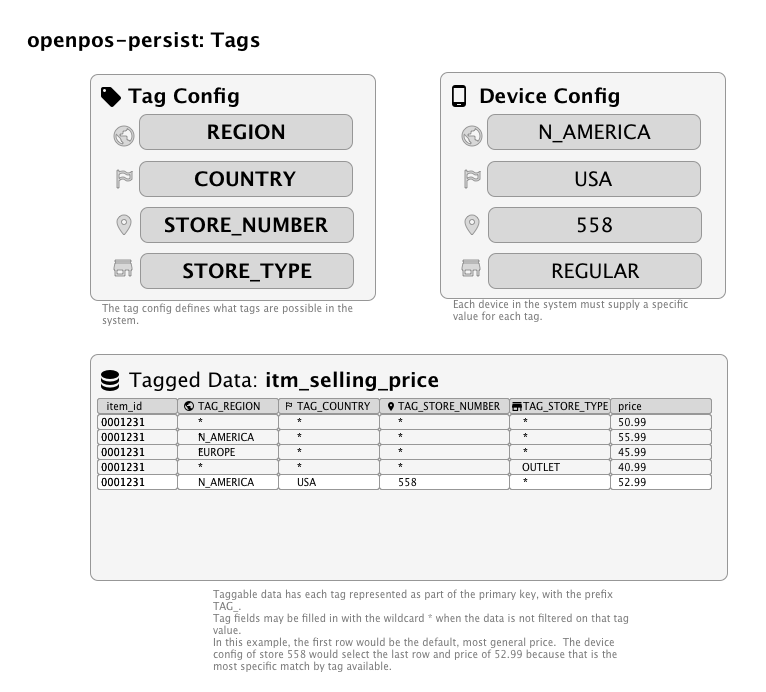
Tagging System
Often an enterprise retail system has the need to segment data different ways. Some may want to segment by brand, some may want to segment by geographical location, or both. Some may need to segment data by store type (regular vs. outlet, or store vs. warehouse).
In an effort to be completely flexible and robust for these requirements, openpos-persist supports the notion of tagging data.
Tagging is a mechanism by which individual table rows can have the same logical key, but different non-key column values that may need to vary by attributes such as store number (a.k.a. business unit id), application ID, country, device ID, or other custom retailer-specific attributes (for example, region or brand).
The set of tags to be used by a system are defined, in part, through configuration. Tags should be planned out as much as possible and not changed on the fly, since changing tags will affect the data model and primary keys.
Naming Conventions
Commerce will automatically add the prefix TAG_ to any tag columns. For example, if the name of the tag is "SALES_REGION",
the corresponding column name added to tagged tables will be TAG_SALES_REGION.
Tagging Example 1
As an example, let's say that a retailer would like to pilot a new tendering option called "Fast Pay", in a select
number of stores, while keeping the tender options for payment unchanged in other existing production stores. Tagging
of rows in the Commerce context button configuration table (ctx_button) would allow the retailer to accomplish this.
Here's how the data in the ctx_button table would be defined:
| button_group_id[^1] | button_id[^1] | effective_start_time[^1] | displayOrder | button_name | tag_business_unit_id[^2] |
|---|---|---|---|---|---|
| tender.tenderOptions | Card | 2020-01-01 00:00:00.000000 | 1 | Card | * |
| tender.tenderOptions | Card | 2020-01-01 00:00:00.000000 | 1 | Credit/Debit Card | 05243 |
| tender.tenderOptions | FastPay | 2023-07-04 00:00:00.000000 | 10 | Fast Pay | 05243 |
[^1]: Logical primary key column.
[^2]: Tagged column, which Commerce automatically adds to the physical primary key.
In the example ctx_button data above, note the first row value of tag_business_unit_id is the asterisk
character (*). When a tag has this value, it means that the data will apply universally for all runtime values of that particular
column unless there is a row defined with a more specific value for that tag. In this case, the Card button would be
displayed on devices for all business units (i.e., all stores). Notice, however, that there is another row defined for
the Card button. The second Card button row has all the same logical key values as the first one, but it has a
different button_name value of Credit/Debit Card and a different tag_business_unit_id value of "05243". Since the
row has a specific value of "05243" for the business unit tag, that row will have priority over the universal row with the
asterisk value for the business unit tag, BUT ONLY for store 05243 and not for any other stores. Likewise, the last row for
the FastPay button will only apply to store 05243 and the button would therefore not be displayed in any other stores.
Tagging Example 2
Default Values
Commerce will define all tag columns with a default value of asterisk, *. This means that the row will be matched to
any value that a device has for that attribute. Newly inserted rows will always insert a value of * for a given tag
unless the SQL insert statement has a specific value for the tag.
Matching Tagged Data
If a row has a value of asterisk, *, for a given tag, Commerce will match any value to that tag. Otherwise, if the row
has a specific value for the tag, the value must match exactly to the attribute value on the device.
Multiple Tagged Columns
If a row has specific values for more than one tag column, the tag column values must ALL match the respective attribute values assigned to the current device in order for the row to be matched. In other words, tags with a specific value are conjunctively combined to determine whether the row should be matched for a given device. The most specific matched row always wins. So if there is a tagged row whose specific tag values match only one (1) of the device attributes, but another tagged row exists whose specific tag values match two (2) of the device attributes, the row with two (2) matching attributes will be selected.
Commerce currently support up to ten tag columns. Currently four of the ten columns are built-in to the Commerce core, and are referred to as "Core tags". The remaining six tag columns can be retailer-specific.
Built-in Core Tags
The following tags are built-in to Commerce and are available for immediate use with tagging of data.
app_id: The identifier of the application. Examples are "pos", "selfcheckout", "pricechecker".business_unit_id: Also known as the store number. This is the unique identifier of the store. NOTE: previous versions of Commerce usedSTORE_NUMBERas the tag name for the business unit ID. If the STORE_NUMBER tag is present in the tags defined in theopenpos.tagconfig.tagsconfiguration, Commerce will use that tag instead of adding a business_unit_id tag.device_id: The identifier of the device. For example, "05243-001"country: The id of the country. This should be the value ofctx_address.country_id. For example, "US".
Core tag values are provided by the Commerce CoreTagProvider class.
User Defined Tags
A retailer can define up to six other tag columns to add to tagged tables. The custom tags are defined under
openpos.tagconfig.tags. The columns will be added to tagged tables in the order they are defined in the configuration.
Here is an example configuration to add three custom tag columns:
openpos:
  tagconfig:
    tags:
      - name: DISTRICT
        group: LOCATION
        size: 30
      - name: STATE
        group: LOCATION
      - name: BRAND
name: The base name of the tag without a prefix. Upper-case, underscore separated is encouraged for this name. These names will be used for database fields. Commerce will add the TAG_ prefix to the column name.
- group: The logical group of the tag. If no group is specified the tag will be assigned to the "DEFAULT" group. Tags
within the same group receive a weight value that is based on the order that they are defined within the group. Tags
which are defined at the beginning of the group have a lower weight than those which are defined at the end of the group.
When evaluating which tagged rows most specifically match the device's attributes, the weight of the tag is used to
determine the best match.
- size: The size to make the tag column. The default size is 32 unless overridden here. VARCHAR fields typically default
to 128 characters in openpos-persist, but that could lead to a primary key that is too wide. Therefore, it makes sense if
you know some of the tag code values will not be larger than 20 or 30 characters, to specify the length in the tag configuration.
In order to provide values for these tags at runtime, the retailer needs to provide an implementation of the ITagProvider
interface. See the Commerce CoreTagProvider class as an example.
Finding Which Tables are Tagged
All tables which are tagged have a corresponding Java model class which implement the ITaggedModel interface.
The model classes either directly or indirectly inherit the ITaggedModel interface via the AbstractTaggedModel abstract base
class. Using IntelliJ Idea, you can easily find all classes that implement ITaggedModel, by right-clicking on the
interface name, and selecting Go To -> Implementations.